App Developer
Webhooks
When you submit an app in the app store, you can specify a webhook URL that we call when changes to data happens on a shop that has your app installed. The kind of notifications you receive depends on what your app has Read access to. If it has read access to products, it will receive product-related change notifications.
Sections in article
Callback
Authenticity
App Components
Entity events
The following event types will trigger a call to your webhook URL
Product
- Delete
- Create
- Update
- If any of this data changes
- Product number
- Vendor number
- Weight
- Stock count
- Stock limit
- EAN/Barcode
- Sort order
- Minimum buy amount
- Minimum buy amount B2B
- Maximum buy amount
- File sales link
- Is variant master
- Notes
- Google taxonomy category
- Rate variant products
- Review variant products
- Is gift certificate
- Prices []
- Amount (quantity)
- Currency code
- B2B group
- Unit price
- Special offer price
- Special offer period id
- Gains percentage (avance)
- Media (more images) []
- Name
- Alt text
- URL
- Mime type
- Sort order
- Thumbnail
- If any of this data changes
Orders
- Delete
- Create
- Update
- If any of this data changes
- Incomplete
- Total price
- Total weight
- Transaction number
- Shipping fee
- Shipping fee includes vat
- Shipping method ID
- Payment fee
- Payment fee includes vat
- Payment method ID
- Order comments
- Customer comments
- Order state ID
- Delivery info
- Phone
- Address
- Address2
- Name
- Company name
- City
- Country
- EAN
- State
- Zip code
- Customer info
- Phone
- Address
- Address2
- Name
- Company name
- City
- Country
- EAN
- State
- Zip code
- Invoice info
- Credit note number
- Invoice date
- Is payed
- Invoice number
- Invoice state
- Delivery info
- If any of this data changes
Customers
- Delete
- Create
- Update
Callback
The data we send to you will consist of an array of “changes” that have occured. Typically there will only be one change in this array, but since we may occasionally bulk events, your system must be able to handle several changes per request.
Each change consists of a string array of fields that have changed, a version of the change (more on that further down this documentation), and a “newValues” and an “oldValues” object representing how the object looked before and after.
To determine what kind of data has changed, we also send a “objectType” field which describes what kind of entity have been changed
An identifier (called “objectIdentifier”) will always be included for the data that has changed as well. For instance, if the data is a product, that ID will be the product number.
Example: Update
In update changes, both “newValues” and “oldValues” is present.
Note also that “<FieldName>Delta” fields are included in “newValues”. These fields are unique to “update”-related changes, but can have a significant impact on the stability of your webhook URL implementation. For more information, see the “Idempotence” section.
[
  {
    "propertiesChanged": [
      "minBuyAmount",
      "maxBuyAmount",
      "notes",
      "stockCount"
    ],
    "oldValues": {
      "objectIdentifier": "my-fancy-product-number",
      "minBuyAmount": 3,
      "maxBuyAmount": 7,
      "notes": "chuck norris",
      "stockCount": 1337
    },
    "newValues": {
      "objectIdentifier": "my-fancy-product-number",
      "minBuyAmount": 1,
      "minBuyAmountDelta": -2,
      "maxBuyAmount": 13,
      "maxBuyAmountDelta": 6,
      "notes": "foobar",
      "stockCount": 1242,
      "stockCountDelta": -95
    },
    "objectType": "Product",
    "version": 1
  }
]
Example: Create
In create changes, only “newValues” is present, and “oldValues” is null.
[
  {
    "propertiesChanged": [
      "minBuyAmount",
      "maxBuyAmount",
      "notes",
      "stockCount"
    ],
    "oldValues": null,
    "newValues": {
      "objectIdentifier": "my-fancy-product-number",
      "minBuyAmount": 1,
      "maxBuyAmount": 13,
      "notes": "foobar",
      "stockCount": 1242
    },
    "objectType": "Product",
    "version": 1
  }
]
Example: Delete
In delete changes, only “oldValues” is present, and “newValues” is null.
[
  {
    "propertiesChanged": [
      "minBuyAmount",
      "maxBuyAmount",
      "notes",
      "stockCount"
    ],
    "oldValues": {
      "objectIdentifier": "my-fancy-product-number",
      "minBuyAmount": 1,
      "maxBuyAmount": 13,
      "notes": "foobar",
      "stockCount": 1242
    },
    "newValues": null,
    "objectType": "Product",
    "version": 1
  }
]
Authenticity
How to verify that the webhook url is requested by the DanDomain webhooks system and not some other system ? And that the body content have not been altered by other systems.
When a hook is fired against the hook url, the request will always contain a http header called x-webhook-signature.
The x-webhook-signature will contain a HMAC signature of the payload send in request body.
This HMAC can be used by the receiver of the hook to verify the validity of the hook.
This should be done by the receiver, by comparing the value of the x-webhook-signature header with a HMAC computed by the receiver.
The hook request should only be trusted if these values are equal.
To calculate the HMAC of the hook body on the receiver end, create a HMACSHA512 of the hook body using the hook secret. And make sure to base64 encode this hash.
C# example
var encoding = Encoding.UTF8;
var keyByte = encoding.GetBytes(secret);
var messageBytes = encoding.GetBytes(message);
using (var hmac = new HMACSHA512(keyByte))

{ var hashmessage = hmac.ComputeHash(messageBytes); hashmessage = Convert.ToBase64String(hashmessage); }
HMAC secret
Secrets can be generated using the admin panel, but be sure to notice that changing a secret will mean you need to change secret used for HMAC in the reciever
App Components
An app in the Webshop consists of the components described below. The “menu item” and the “App API permissions” are installed in the Webshop upon app installation. The AppShortCodes and AppScripts are optional components that can be added by the app developer using the shop API, after an app has been installed.
- Menu item in the left menu of the shop administration module links to an embedded iframe that load an external website.
- The URL loaded in the iframe is defined creating the app in the partner portal. The URL can be individually modified for each unique shop installation of the app.
- To identify the individual shop calling the external website, the webshop identifier is appended to the app iframe URL as querystring parameter “shopidentifier”.
- App API permissions are defined by shop API user and usergroup, which are defined when creating the app in the partner portal.
- The user key is returned as a request parameter appended to the install URL defined.
- AppShortCodes which can be inserted in “shop texts” and “design templates” to render custom code snippets. NOTE: The shop owner is always responsible for manually inserting or removing ShortCodes in the shop, as the use of these may vary from site to site and design to design.
- A ShortCode consists of a variable name, script content and a type, which determines where the ShortCode can be inserted.The name of the ShortCode is defined by the app developer when injecting it through the WebAPI.To make the ShortCode name unique, an app prefix (defined during creation of the app in the partner portal) and a hyphen is appended to the name specified by the app developer. Furthermore the ShortCode is wrapped in [[ ]] brackets when inserted in shop.An example:
A ShortCode injected with the name “MyShortCode” and the provided prefix “MyApp” gives the ShortCode “[[MyApp-MyShortCode]]“. - A type has to be defined for the ShortCode. The type defines where the ShortCode will be available as replace variable.Valid types for the shortcodeType property of the appShortCodeDto are as follows:
SOAP REST DESCRIPTION Everywhere 1 Available on both texts and design templates Texts 2 Can be used on all text field under “Design/Texts” ProductInfo 3 Design template ProductList 4 Design template ProductListInfo 5 Design template Price 6 Design template Related 7 Design template Frontpage 8 Design template FrontpageInfo 9 Design template Basket 10 Design template ShowBasket 11 Design template ShowBasketInfo 12 Design template Favorites 13 Design template OrderStepOne 14 Design template ProductListSubPage 15 Design template
- A ShortCode consists of a variable name, script content and a type, which determines where the ShortCode can be inserted.The name of the ShortCode is defined by the app developer when injecting it through the WebAPI.To make the ShortCode name unique, an app prefix (defined during creation of the app in the partner portal) and a hyphen is appended to the name specified by the app developer. Furthermore the ShortCode is wrapped in [[ ]] brackets when inserted in shop.An example:
- AppScripts which will be rendered in the shop frontend for a specific site and shop page.
- An AppScript consists of three script sections:
- HEAD
Content in the head script is rendered in the HTML HEAD tag after any other shop specific content. - BODY START
Content in the body start script will be rendered in the top of the HTML BODY tag. - BODY END
Content in the body end script will be rendered in the bottom of the HTML BODY tag.
- HEAD
- An AppScript can be limited to a specific shop page, or rendered for all requests using these values in the pageType property of the appScriptDto.
SOAP REST DESCRIPTION All 0 Displayed on all page requests Frontpage 8 /shop/frontpage.html Productlist 9 All productlists (including search, specialoffers, and news) Productinfo 10 Product details Showbasket 11 /shop/showbasket.html Order1 12 /shop/order1.html Order2 13 /shop/order2.html Order3 14 /shop/order3.html Order4 15 /shop/order4.html Tip 17 /shop/tip.html B2Blogin 18 /shop/b2blogin.html Terms 19 /shop/terms.html Profile 20 /shop/profile.html Advancedsearch 24 /shop/advsearch.html Customercare 25 /shop/customer.html Favorites 26 /shop/favorites.html Checkout 27 One page checkout
- An AppScript consists of three script sections:
App Install notification URL
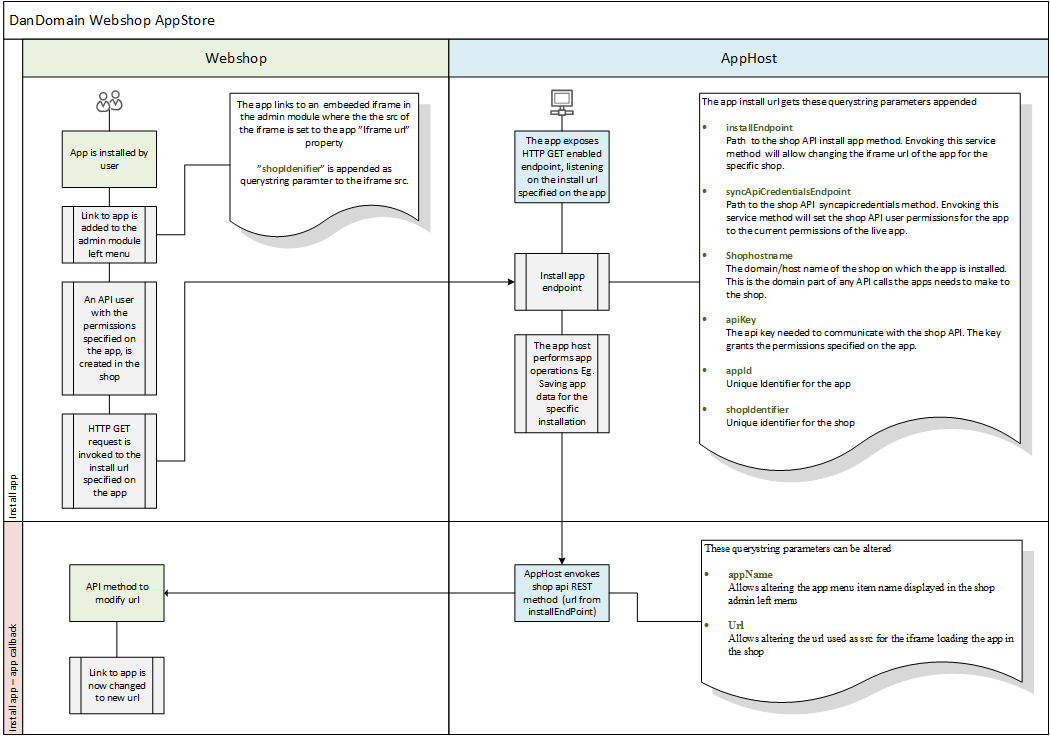
When an app is installed on a Webshop, the app developer is notified by a HTTP GET request to the install URL defined on the app.
These parameters are appended to the install URL
| NAME | FORMAT | DESCRIPTION |
| installEndpoint |
string | Path to the shop API install app method. Envoking this service method will allow changing the iframe URL of the app for the specific shop. |
| syncApiCredentialsEndpoint |
string | Path to the shop API syncapicredentials method. Envoking this service method will set the shop API user permissions for the app to the current permissions of the live app. |
| shophostname |
string | The domain/host name of the shop on which the app is installed. This is the domain part of any API calls the app needs to make to the shop. |
| apiKey |
guid | The api key needed to communicate with the shop API. The key grants the permissions specified on the app. |
| appId | integer | Unique Identifier for the app. |
| shopIdentifier | integer | Unique identifier for the shop. |
| priceVariant | integer | Unique Identifier for the price variant of the app. |
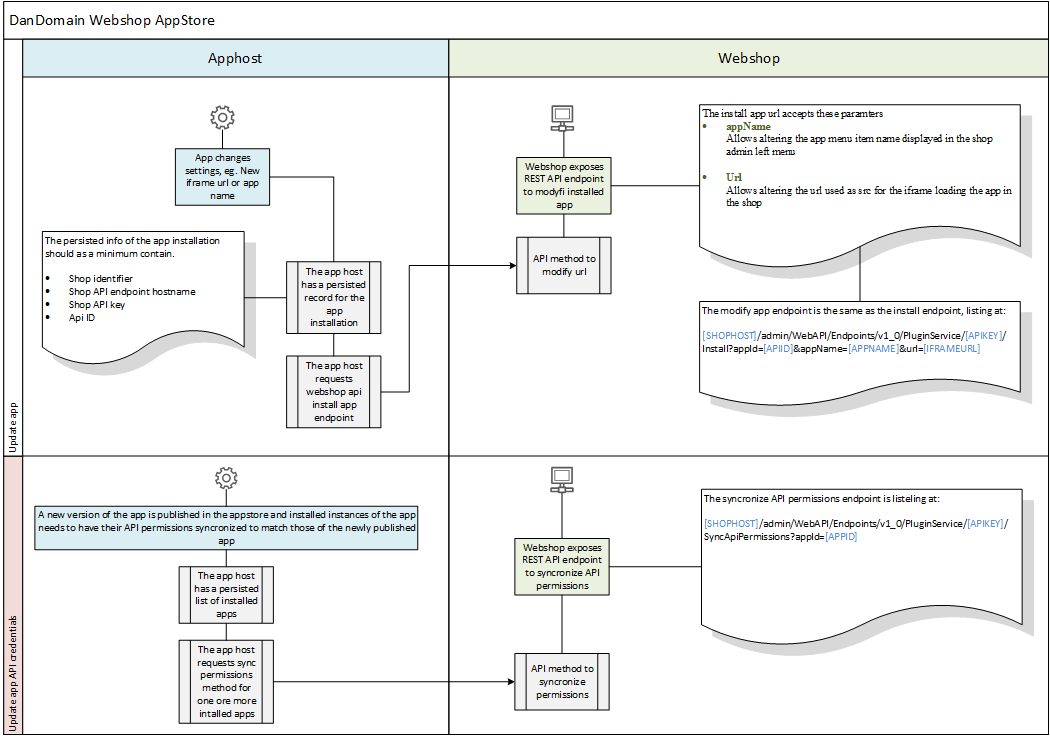
App install- and update flows
Below the flows regarding install app and update app can be seen.
Install App

Update App

App Uninstall notification URL
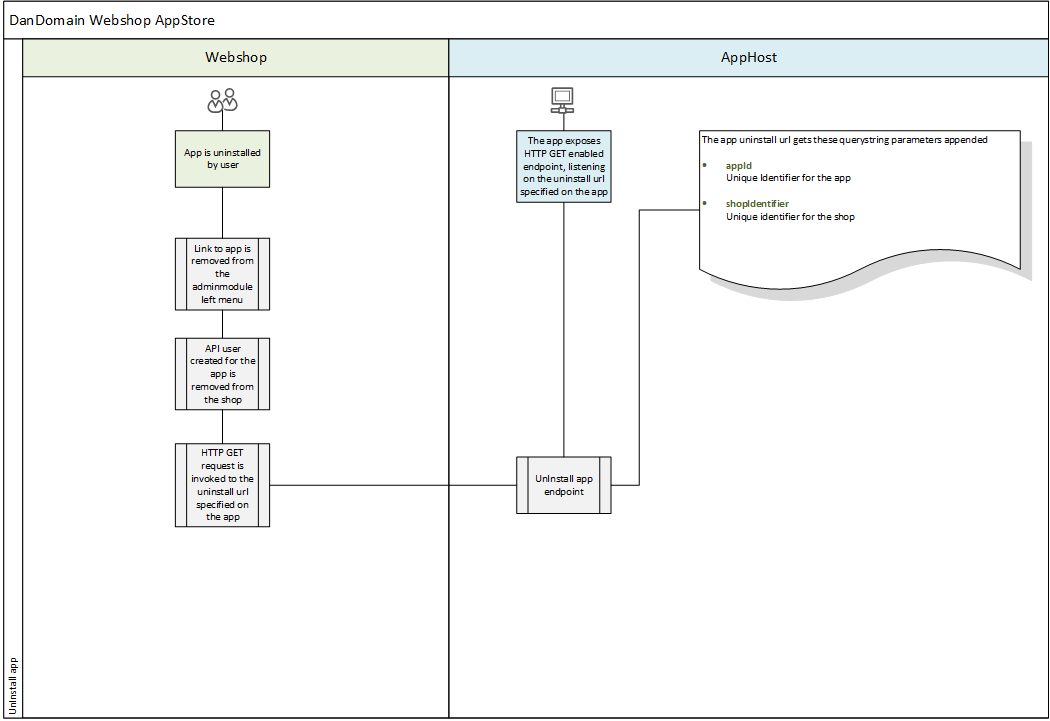
When an app is uninstalled from the Webshop, the app developer is notified by a HTTP GET request to the uninstall URL defined on the app.
These parameters are appended to the uninstall URL:
| NAME | FORMAT | DESCRIPTION |
| appId | integer | Unique Identifier for the app. |
| shopIdentifier | integer | Unique identifier for the shop. |
App uninstall flow

App API interactions
Once an app is installed, the app developer can interact with the installed app components by Invoking the Webshop API.
The API supports both REST and SOAP. Documentation can be found below:
SOAP
[SHOPHOST]/admin/WebAPI/Endpoints/v1_0/PluginService/help
REST
[SHOPHOST] /admin/WebAPI/Endpoints/v1_0/PluginService.svc
-
- Changing URL of the app iframe and the name of the app menu link
HTTP GET request to:[SHOPHOST]/admin/WebAPI/Endpoints/v1_0/PluginService/[APIKEY]/Install?appId=[APIID]&appName=[APPNAME]&url=[IFRAMEURL] - Synchronizing the permissions of the shop API user created by the app
HTTP GET request to:[SHOPHOST]/admin/WebAPI/Endpoints/v1_0/PluginService/[APIKEY]/SyncApiPermissions?appId=[APPID] - Getting a list of available sites for the shop
HTTP GET request to:[SHOPHOST]/admin/WebAPI/Endpoints/v1_0/PluginService[ APIKEY ]/SiteInfo/[APPID]/ - Adding or updating AppScripts:
HTTP POST request to:[SHOPHOST]/admin/WebAPI/Endpoints/v1_0/PluginService/[APIKEY]/[APPID]/SetAppScriptBody:
[{ "bodyEndContent":"body end script", "bodyStartContent":"body start script", "headContent":"head script content", "pageType":0, "siteId":26 }] - Deleting an AppScript
HTTP DELETE request to:[SHOPHOST]/admin/WebAPI/Endpoints/v1_0/PluginService/[APIKEY ]/DeleteAppScriptForPage?appId=[APPID]&pageType=[PAGETYPE] - Adding or updating AppShortCode
HTTP POST request to:[SHOPHOST]/admin/WebAPI/Endpoints/v1_0/PluginService/[ APIKEY ]/[APPID}/SetAppShortCodeBody:
[{
    "content":"my script",
    "name":"MyShortCode",
    "shortcodeType":1,
    "siteId":26
}]
- Changing URL of the app iframe and the name of the app menu link
- Deleting AppShortCode
HTTP DELETE request to:[SHOPHOST]//admin/WebAPI/Endpoints/v1_0/PluginService/[APIKEY ]/DeleteAppShortCodesBy?appId=[APPID]&type=[TYPE]&name=[NAME]&siteId=[SITEID]

